• Skip to primary navigation
  • Skip to main content
  • Skip to primary sidebar
Downeats logo
  • My Story
  • Recipes
  • Work With Me
  • Contact
  • Learn
    • Freebies
    • Mini Photo Course
    • Curated Resources

Gluten Free Banana Cake

Mar 30, 2022 · Leave a Comment

Slice of gluten free banana cake on a plate

February and March are the months I turn to the not-so-seasonal desserts for inspiration. By the time March rolls around, we’ve surely baked, blended and snacked our way through any frozen berries we had saved from the previous summer. One thing I like to make as an afternoon treat is banana cake. I usually make it once a week, and it lasts only a couple of days. Sometimes with a cream cheese frosting, sometimes without. The few weeks I’ve been playing around with gluten-free grains, particularly oat flour, brown rice flour and buckwheat. I do love buckwheat, but for this gluten free banana cake I decided on a blend of rice flour and a little tapioca starch. If you’ve been looking for the perfect gluten free banana cake, you’ll probably love this recipe. It’s simple, delicious, and fairly quick to make!

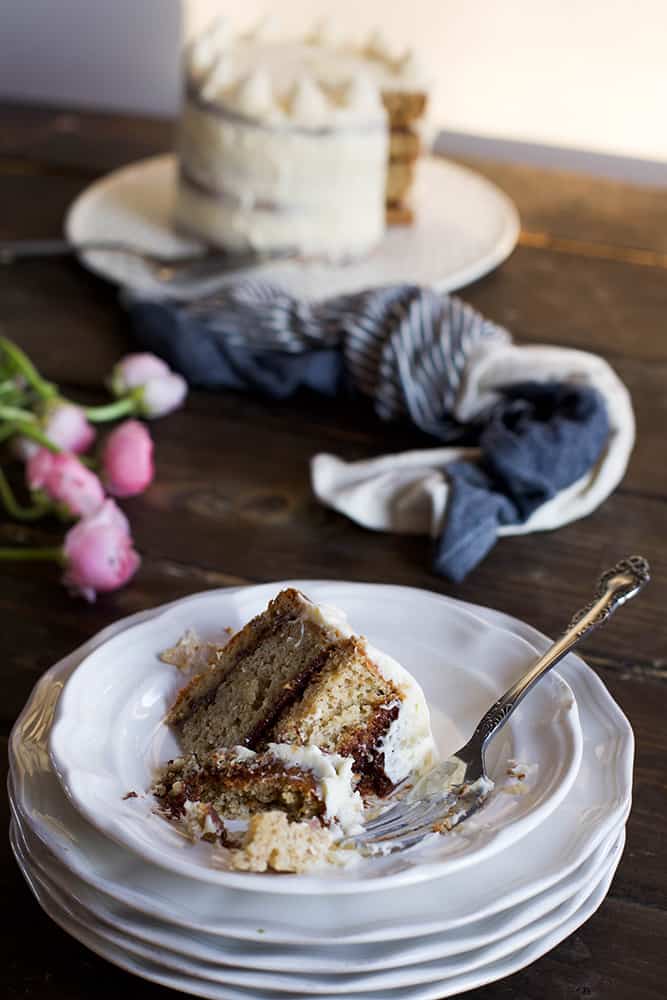
I have found that banana cake and banana bread are often interchangeable- usually a quick bread and made in a loaf pan. I thought it would be fun to make this gluten free banana cake more like a traditional layer cake. It’s a little more special, and it’s also quite fun to assemble! In between the layers, I used a chocolate hazelnut spread (this one from Artisana), but you can use cream cheese frosting if you prefer. If you have a dairy allergy, or prefer not to use cream cheese frosting, this banana cake is nice with just the chocolate/hazelnut spread in between the layers and a light dusting of confectioners’ sugar on top!

slice of gluten free banana cake on a plate

Gluten Free Banana Cake Ingredients

If you are gluten-free you most likely have these ingredients at home. If not, they are easy enough to find at your local grocery store or you can order them.

Brown Rice Flour– Brown rice flour has been my trusted baking flour since cutting out gluten. It definitely has a more wholesome flavor than the all-purpose gluten flour that I usually bake with, and pairs great with a sweet frosting.

Tapioca Starch– Tapioca starch comes from cassava root, which is a root vegetable similar to a potato or sweet potato. The starch is used in things your probably familiar with-tapioca pudding, or the bubbles in bubble tea! It is commonly used in gluten-free products and gives a texture that is a little bit chewy, resembling gluten.

Baking Powder– This helps the batter to rise.

Baking Soda– Again, helps the batter to rise, preventing a dense cake.

Bananas– In a gluten free banana cake, this is a necessity. I used 3-4 ripe bananas.

Eggs– Eggs give the cake a good structure.

Sugar– The first time I made this I used only granulated sugar, and it was delicious, but you’ll notice that I now also include brown sugar. The combination just works. (Of course, if you don’t have brown sugar on hand you can substitute the brown for additional granulated sugar)

Brown Sugar– Dark or light, but I like dark.

Vanilla– Just a touch of vanilla extra, for flavor. Also, used in the cream cheese frosting!

Salt– Just a pinch, to prevent the cake from being too bland.

Butter– One stick, for the cream cheese frosting (optional)

Cream Cheese– Again, for the cream cheese frosting. One package will do (optional)

Confectioners’ Sugar– For the cream cheese frosting, but if you choose to not do frosting, it’s nice to serve a dusting of sugar on top!

Chocolate Hazelnut Spread– I used a chocolate hazelnut spread for in between the layers of cake. You can also use cream cheese frosting instead, but I think chocolate and banana and hazelnut go so well together! I prefer to use this brand.

hands serving a slice gluten free banana cake

Gluten Free Banana Cake

This banana cake is sweet and delicious! I like to serve it as a layered cake with chocolate hazelnut spread between the layers, and cream cheese frosting on top!
Print Recipe Pin Recipe
Prep Time 20 minutes mins
Cook Time 1 hour hr
Cooling Time 1 hour hr
Servings: 8 people
Course: Dessert
Cuisine: American
Calories: 140
Ingredients Method

Ingredients
  

For the Banana Cake
  • 3-4 Ripe bananas
  • 1/4 Cup Sour cream
  • 2 eggs
  • 1/2 Cup Granulated sugar
  • 1/4 Cup Dark brown sugar
  • 1 Tsp Vanilla
  • 1 1/2 Cups Brown rice flour
  • 1/4 Cup Tapioca starch
  • 2 Tsp Baking powder
  • 1/2 Tso Baking soda
Cream Cheese Frosting
  • 8 oz Cream cheese
  • 4 oz Butter
  • 2 Cups Confectioners' Sugar
  • 2 Tsp Vanilla
Additional
  • Chocolate Hazelnut Spread for in between layers (optional)

Method
 

Make the cake
  1. Preheat the oven to 350˚F. Brush two 6" pans lightly with oil, and then dust gently with brown rice flour. Line the bottoms with parchment just in case.
  2. In a small mixing bowl, combine the dry ingredients: brown rice flour, tapioca starch, baking soda, baking powder and salt. Set aside.
  3. In a larger mixing bowl, mash the bananas until a puree forms.
  4. Mix in the sour cream, both sugars, eggs, and vanilla to the banana mixture one at a time, and mixing between each addition. Be sure that everything thoroughly incorporates.
  5. Fold in the mixture dry ingredients, and fold/mix gently until there are no more dry spots.
  6. Divide the batter between two pans and bake about 50-60 minutes, or until a toothpick comes out clean. Set aside and allow the cakes to cool, about 15-20 minutes and then remove them from the pans. Allow them continue cooling on a baking rack until room temperature before frosting.
Make the cream cheese frosting
  1. In a stand mixer with a whisk attachment or large mixing bowl using an electric mixer, combine the softened butter, cream cheese, sugar and vanilla. Whip until light and fluffy, about 7-8 minutes.
Assemble the cake
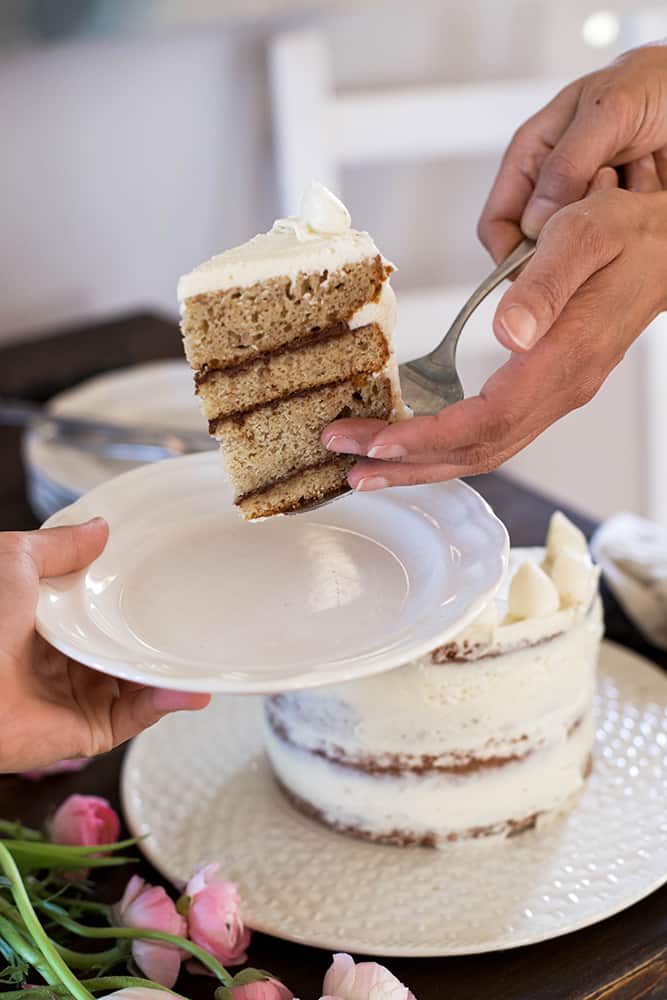
  1. Slice each cake the horizontal way, keeping them as even in width as you can, so you have four cake rounds/layers instead of two. To create a layer cake, we'll frost the top of one cake and then stack another layer on top.
  2. Using a chocolate hazelnut spread, or cream cheese frosting if you prefer, cover the entire top of one layer and then stack another layer of cake on top. Continue this until you've used all four layers of cake. If you're using chocolate hazelnut spread, do not cover the top of the final layer with it, as it will have cream cheese frosting.
  3. Spread the top layer of cake and the sides with cream cheese frosting. You can use however much you prefer- I chose to make mine "naked" style, so more frosting on top, and very thin layer of frosting on the sides.
  4. Using a piping bag and a circular, scoop any remaining cream cheese frosting into the bag, and round tip (or a ziploc bag with a small hole cut in one corner), squeeze and decorate small droplets of frosting along the top outer edge of the cake.
  5. Enjoy! For storing, keep it in the fridge overnight. I feel it's best served at room temp, so take it out of the fridge a few hours before serving to let it warm up. Keep for about 5 days or so.

Baking with Kids, Desserts, Recipes

Reader Interactions

Leave a Reply Cancel reply

Your email address will not be published. Required fields are marked *

Recipe Rating


Primary Sidebar

Welcome!

Amber Rogals with daughter

Downeats is a journal that shares food stories and recipes, and photography. It is devoted to home cooking, gathering with loved ones, living slow and imperfectly. The name Downeats is a foodie play on the Downeast region of the coast of Maine- so everything is New England inspired.

Learn More >>

Slow Living & Family Recipes
Once a week emails to support your home cooking and slow living lifestyle. Want to join the community?
Welcome! I'm so excited for you to join our community. Keep an eye on your inbox :)
  • Instagram
  • Pinterest

Recently

  • French Crepes Recipe (Easy and Classic Crêpes!)
  • Buckwheat Flour Banana Bread
  • Gluten free Potato Soup
  • Gluten Free Shortcrust Pastry (No Xanthan Gum)
  • Banana Buckwheat Pancakes (Gluten Free)

Archives

  • May 2023
  • January 2023
  • November 2022
  • September 2022
  • May 2022
  • April 2022
  • March 2022
  • November 2021
  • October 2021
  • August 2021
  • July 2021
  • March 2021
  • February 2021
  • November 2020
Whoopie Pies aren’t my favorite, but it’s fun Whoopie Pies aren’t my favorite, but it’s fun to make them 1-2 times a year. However, the kids love them and they are, after all, the official dessert of Maine (along with blueberry pie, which I much prefer!)

These are super simple to make, and yes, I even opted for the traditional marshmallow fluff to incorporate into the buttercream frosting. I’m most certain my micro bakery would (will) not have these in the regular repertoire, except on special occasions, so here’s the recipe in case you’d like to make them at home:

Whoopie Pie Dry Ingredients
1 1/2 Cups flour
3/4 Cups Baking Cocoa
1 1/2 Tsp. Baking Soda
1/2 Tsp Salt

Whoopie Pie Wet Ingredients:
1 Cup Loosely packed light brown sugar
1 Stick butter (about 15 Tbsp), softened
1 1/4 Cups Buttermilk (Or 1 1/4 Cups milk + 1 Tsp of an acid, lemon juice or vinegar will work)
1 Egg
1 Tsp Vanilla

Icing

2 sticks Sticks butter (about 1 cup) softened
1 Cup Powdered sugar
7 Oz. Marshmallow fluff
1/4 tsp. Salt

1. Preheat the oven to 375 F.
2. In a small mixing bowl, whisk together the dry ingredients, and set aside.
3. In a larger mixing bowl, whip together the butter, sugar, egg and vanilla. 
4. Add the flour and milk to the butter and sugar mixture 1/3 at a time, alternating between additions. (Add 1/3 of the dry mixture, then 1/3 of the milk mixture, then mix until incorporated. Continue until there you’ve used all the dry mixture, and milk)You should have a fairly thick batter.
5. Use a spoon to scoop tablespoon size dollops onto the baking sheet, about 2” apart from each other. I try to make them about 2” in diameter, but you can make them bigger if you want larger whoopie pies.
6. Bake for 11 minutes and allow to cool completely. 
7. To make the frosting, whip together the butter, sugar, and marshmallow fluff, and salt until fluffy and fully blended together, about 3 minutes on high speed.
8. To sandwich them together, scoop about 1-1 1/2 tbsp of filling onto the flat side of one cake, then gently squish the flat side of another cake on top to form a sandwich.
9. Enjoy!

#maine #portlandmaine #bakersgonnabake #baking #sweets #bakersofinstagram #whoopiepie #whoopiepies #sweeeeets #recipeshare #recipeoftheday
Let’s be honest: there is nothing “lazy” abo Let’s be honest: there is nothing “lazy” about making croissants. They are one of the most laborious, meticulous, finicky things I’ve ever made (besides children) but it makes me love them all the more. And if you know me well, you probably know that my idea of a “lazy” day is obsessively perfecting some type of craft or other. 

I’m still perfecting recipes but was quite pleased with how these turned out! They are on the small side, as you can see, because I’m doing half batches while I test. 

I’ve had a few messages already about when/where to get my baked items. I do appreciate it so much and am thinking about putting together a small lineup of my best (Demi baguettes, croissants, olive bread, batard, maybe cookies) for whomever is close by and wants some!

#croissant #croisssnts  #baking #sourdough #naturallyleavened #bakersgonnabake #pastry #bakersofinstagram #handrolled #baking  #portlandmaine #maine #microbakery
Should I, though? 😏✨ #maine #sourdough #mic Should I, though? 😏✨ 

#maine #sourdough #microbakery #bakersgonnabake #portlandmaine #baking #naturallyleavened #bakersofinstagram #sourdoughclub #crumbshot #bakebakebake #wildyeast
Did you know that scoring your dough isn’t just Did you know that scoring your dough isn’t just for decoration? Scoring bread allows you to control where the gases in your dough will escape from when it rises while baking. If you didn’t score your bread at all, the gases would escape from the weakest point causing your bread to tear while baking. Scoring allows you to control where this happens.

Okay I guess, technically, that is sort of an aesthetic reason, though, isn’t it? 😂

#sourdough #sourdoughbread #microbakery #wildyeast #naturallyfermented #bakersgonnabake #portlandmaine #maine #scoring #naturallyleavened #sourdoughclub #bread #breadbaking #bakersofinstagram
BB= Brown Butter chocolate chip cookies 🍪 If BB= Brown Butter chocolate chip cookies 🍪 

If I owned a bakery, these would most definitely be on the menu. I’ve tried many chocolate chip recipe variations, and the truth is they are all really good. Best chocolate chip cookie comes down to a matter of preference. I love the caramel-like sweetness of brown butter, large chunks of dark chocolate that pool into melty puddles, and slightly crisp edges that get chewy towards the middle, and then finally soft in the center.

What’s your ideal chocolate chip cookie? Flake salt on top? Thin and crispy? Cakey or chewy?

#chocolatechipcookies #cookies #cookiefix #chocolate #chocolatelover #microbakery #sweettooth #dessertfirst #baking #pastry #bakersgonnabake #homebaker #chocolatechipcookie #portlandmaine #maine #bakersofinstagram
Sourdough morning buns with a hint of orange zest, Sourdough morning buns with a hint of orange zest, dipped in sugar. I haven’t made these in a while, and forgot how delicious they are (and how good they smell!). 

I’ve been spending a lot more time in the kitchen, tending to a new sourdough starter and testing out cookie and croissant recipes. I actually haven’t baked since we moved, but it’s really nice to be back to it. 

#sourdough #buns #naturallyleavened #portlandmaine #sweets #eatmaine #sourdoughbuns #baking #bakersgonnabake #morningbuns
Who wants a loaf? 😏🥖 #maine #portlandmaine Who wants a loaf? 😏🥖 

#maine #portlandmaine #sourdough #sourdoughbread #naturallyleavened #crumbshot #breadmaking #sourdoughbaker #bakersgonnabake #microbakery
Strawberry rhubarb with a buckwheat crust 💕 Bec Strawberry rhubarb with a buckwheat crust 💕 Because seasonal tarts-both sweet and savory-are such a treat! 

#baking #bakersofinstagram #bakersgonnabake #bakedwithlove❤️ #strawberryrhubarb #rhubarb #tarts #galette #maine #portlandmaine #dessertfirst #sweeeeets #fromscratch #pastry

Copyright © 2025